Importing Records from a File
You can create a new review file by importing a list of barcodes, record numbers, or indexed field values. Before creating your list, see Format of Input Files for information on how to format your files.
To import from a file:
- Select Create Lists from the Function list.
- On the Review Files tab, select an empty review file by clicking its row, or select a file to overwrite. To find empty review files, select Empty from the drop-down menu of review file types.
- Click Import Records.
- If prompted to overwrite the existing file, do one of the following:
- Click Yes to open the Import Records dialog box and overwrite the file.
- Click No to return to the list of review files.
- Enter a name for the review file. The maximum length is 150 characters.
- Select how you want to import records into the review file by doing one of the following:
- To import a list of barcodes, select the Barcode radio button.
- To import a list of record numbers, select the Record Number radio button.
- To import a list of index entries, select the Index radio button, and select an index from the drop-down menu.
- From the Store Record Type list, select a record type to store. The list shows only the valid record types for the import method or index you selected in the step above.
- Click Choose File. The Select File dialog box opens.
- Select the text file containing the data you want to import, and click Load. Create Lists processes the file and displays the results in the bottom half of the Import Records dialog box.
Error Messages During Loading
If the file you selected contains entries that cannot be loaded, Create Lists displays an error message. See Error Messages During Loading for more information.
- Click Import to create the review file, or click Cancel to close the dialog box without creating a review file.
Format of Input Files
Input files must be formatted with one value per line. The system searches for exact matches only; partial matching is not supported (for example, entering “12345” in a file will not find a barcode with the value of “123456”).
In addition to the rules above, each input method has additional formatting requirements listed below.
- Barcodes
- When importing a list of item or patron barcodes, keep the following in mind:
- You can import barcodes using either a .txt or .csv file.
- Include the barcode number only; do not include the field group tag.
- Record Numbers
- When importing a list of record numbers, keep the following in mind:
- You can import record numbers using a .txt file only; .csv files are not supported.
- Valid record numbers must begin with the record type tag, such as “b” for bibliographic records.
- Create Lists recognizes record numbers with a character length equal to the smallest record number in the system up to the largest record number in the system.
- The system ignores delimiters and other extraneous text.
- The check digit is not required, but can be included. If your library has mixed-length record numbers, Innovative recommends excluding the check digit, as a 6-digit record number might be confused with a 7-digit record number. In this case, you can import 6-digit and 7-digit numbers separately.
- Indexed Fields
- When importing a list of indexed field values, keep the following in mind:
- You can import record numbers using either a .txt or .csv file for indexed fields.
- Phrase indexes are supported; keyword indexes are not supported.
Error Messages During Loading
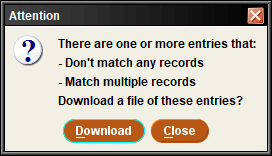
When you load a .csv or .txt file, Create Lists processes each entry in the file. If any entries cannot be loaded, Create Lists displays an error message stating there are one or more entries that:
- Don’t match any record
- Match multiple records
- Don’t fit in the review file
For example:
To download the error file:
- Click Download. The system opens the Save file dialog box.
If you are using Sierra Web, the system automatically saves the file to your Download folder.
- Enter a name for the error file.
- Navigate to the location where you want to save the file.
- Click Save. Create Lists saves your file and returns you to the Import Records dialog box.
- If you have valid entries (shown in the bottom half of the Import Records dialog box), continue with the import process above.