Create List Functions

Functions are listed alphabetically by button label. To begin any function, choose Create Lists from the Function list.

Adding Individual Records to a Review File

To add records to an existing list:
1. Open the existing review file by clicking Show Records.
2. Click the Add icon in the upper right margin.
3. Select the search you would like from the “Add a Record to File” box that appears. The search type will match your review file type, such as item, bib, or patron. Either scan a barcode or enter a search term. Tip: you can scan book barcodes to add them to a review file so you can make changes to a group of books.
4. Enter the information from the item, bib, or patron you want to add. Click Search to bring up the information. 
5. Determine if the result is a record you wish to add and click Select (this will also bring up more information), then Use Bib or Use Item Record or Use Patron Record.
6. The record is added to the bottom of the list.

Adding a Set of Records to a Review File

To append a set of records to an existing list: 
1. Choose the review file to which you want to add records by selecting its row.
2. Click Append on the toolbar. Click Yes if asked if you would like to continue. The Boolean Search window will open. 
3. You can change the title for the review file by entering a new title. The title can be up to 50 characters long. 
4. Enter your search criteria. If you want to append all records in a range, do not enter any criteria other than the range. 
5. Click Search to begin. If you did not enter any criteria other than the range, the system asks if you want to retrieve all records in the range. Choose Yes to continue.
6. The results of the new search will be added to the existing list.

Copying a Review File

To copy an existing review file to an empty review file:
1. First, select an empty review file.
2. Click Copy on the toolbar.
3. Select the existing review file from the list. Click OK.

When using Create Lists to run a query or search, you should select an empty review file that allows for enough records for your expected results to be stored. If, after running the Create Lists search, you discover that the review file is much too large for your results, you can use the Copy feature to move those records to a smaller review file.

There are review files that are available in “Copy” that cannot be found in the list of review files. These include:

  • System generated files, like labels in cataloging
  • Decision Center reports
  • Mobile worklists lists sent to review file

In these cases, the login, date, and number of records can be clues to finding your review file.

Deduping a Review File

If you have appended a list, merged lists, or added to an existing list, it may become necessary to dedupe the list to remove any records that may be repeated.

To dedupe a review file:
1. Select the list you wish to dedupe and click the Dedupe button on the top right toolbar.
2. Wait until the file status changes from “In Progress” to “Complete.”

Emptying a Review File

Emptying review files frees up space for other Mid-Hudson Library System members to create lists.

To empty a review file:
1. Select the list you wish to empty and click Empty on the toolbar.
2. Click Yes when you are asked if you are sure.

List Records

You can use the List Records button to print or email a list. Warning: printing can use a lot of paper if not well-formatted.

To print the contents of a review file:
1. Select the list you wish to print and click List Records. A pop-up box will appear.
2. Input the fields to be listed in the print-out. Select the record type and field of each field that you wish to print. Tip: to retrieve the titles of items, use Bibliographic as the record type.
3. Input a Page heading if desired.
4. Choose the desired formatting options for your print-out.
5. Click Print List when finished. If this brings up the Select Standard Printer pop-up box, select Local Printer, then select your preferred printer.
Tip: edit the range of records to include only a few records to test your print job before sending the entire list. Consider using marc tags and subfields to minimize extraneous field data.

To email the contents of a review file:
1. Select the list you wish to print and click List Records. A pop-up box will appear.
2. Input the fields to be listed in the email. Select the record type and field of each field that you wish be shown. Tip: to retrieve the titles of items, use Bibliographic as the record type.
3. Enter a Page heading if desired. This will appear as the first line in the email.
4. Choose the desired formatting options for your email. Tip: Change 0 to 1 or more to provide space between entries in the list.
5. Click Print List when finished. In the Select Standard Printer pop-up box, select Send to email address. Click OK.
6. Enter the email address that will be receiving the file.
7. Enter an email note if desired. This will appear before the Page heading (if present) on the first line of the email.
8. Click
OK.
Tip: if the option for E-mail Printer does not appear, it might need to be set up. Click on File, Select Printer and Standard Printer. This will bring up the Select Standard Printer and Question pop-up box. Enter the email address and click OK.

Merging Review Files

When you have two similar review files that you want to combine into one review file, you can use the merge function.

To merge review files:
1. Choose one of the two review files that you want to merge by selecting its row.
2. Click Append on the toolbar. Click Yes if asked if you would like to continue. The Boolean Search window will open.
3. Choose Review from the Range drop-down list and select the review file you want to merge into the current review file.
4. Click search.
5. (Optional) Remove duplicate records by clicking Dedupe.
6. Empty the review file that was appended to the current one.

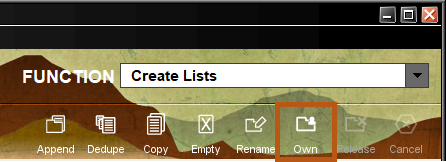
Owning and Releasing a Review File

When a user creates a review file, the system associates the creator’s login with that file, displaying their username in black text. When someone has claimed ownership of a review file, the login username is changed to red italic text that indicates ownership. Owned review files will not be emptied by MHLS staff weekly, but if you own a large number of review files, you will be asked to release some for other members to use.

To own a review file:
1. Select the review file you wish to own.
2. Click Own in the toolbar.


To release a review file:
1. Select the review file you wish to release.
2. Click Release in the toolbar.

Note: If you empty an owned review file, you will retain ownership of the empty review file. Release the file to allow it to be used by others.

Sorting a Review File

Once a review file is created, it can be sorted. You can sort a list of records by any of the data elements the records contain.

To sort a list:
1. Select the review file you wish to sort. Click Sort Records.
2. Select the record type (item, bibliographic, or patron) and field of the primary sort criterion.
3. (Optional) Click Append to add a secondary sort criterion, third sort criterion, and so on. You can specify a maximum of 32 different sort criteria.
4. Click Sort.
5. The system will sort the list in alphanumeric or chronological order, depending on the data type of the sort criteria. Records that do not include the specified sort field will appear at the beginning of the resulting sorted list.